Welcome to Another Shadowraith Gimp Tutorial (A.S.G.T)This is a full signature tutorial, fairly basic and should be rather easy to follow. Want I really want you, the reader, to achieve from this tutorial, is not just a new sig, but new techniques, these are the heart of a sig, without any all sigs would be bland and boring. I will show you how to make the most of these simple techniques to make a very complex sig. This sig was almost completely made with Defaults. Now let's get started
 Resources
-
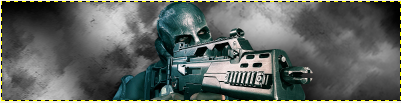
Render-
Logo-
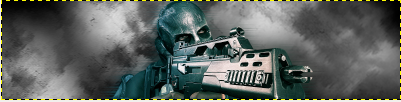
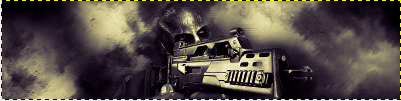
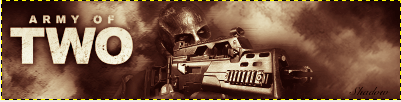
Sentinel GFX Brush SetTutorialIn this tutorial you will be making a sig like this:
 Step 1
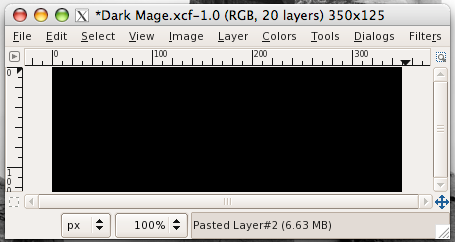
Open up a new canvas, I will be using 400x100, get out the Paintbucket tool and fill with black.
 Step 2
Next scale your render to fit inside the sig and paste it in on a new layer.
 Step 3
Make a new transparent layer and move it just beneath the render layer. Get out the Paint brush tool, change your FG color to white, select a couple brushes from the Cloud set you have just downloaded and make a couple of clicks so that it fills almost the entire sig. Leave this layer as Normal at 100% opacity.
 Step 4
Duplicate your render layer twice, move one just underneath the render layer and leave the other duplicate where it is. Select the one below the original render layer, go Filters>Blur>Gaussian Blur and change the settings to 20. Now go Filters>Distorts>Shift and change the settings to 10.
 Step 5
Now go to the other duplicated layer and go Filters>Blur>Gaussian Blur and leave the X and Y settings at around 20. This bit is rather tricky so listen carefully. Go back to your original render layer and go Layer>Transparency>Alpha To Selection, then Select>Shrink by about 5 pixels, then Select>Feather and change it to around 10 pixels. Then select your render duplicated layer which is above the original render layer and go Edit>Clear and set this duplicated layer to Normal at 100% opacity. Almost done so bare with me, now go Select>Invert, go back to the original render layer and go Edit>Clear. Hope you're still with me

 Step 6
Go Edit>Copy Visible then Edit>Paste into a new layer, move this layer to the top of the layer stack. Duplicate this layer 3 times, call them
Color#1, Color#2, Color#3 from bottom to top.
 Step 7
It's time to turn this image into a sig. On the first duplicated layer (Color#1), change your FG color to a strong red, I used ff1010 and your BG to a strong yellow, I used efe70d. Go Color>Map>Gradient Map. Set this layer to Overlay at 70% Opacity. Now go to the Color#2 layer, change your FG to a strong blue (0617ed) and leave your BG as a strong yellow. Do another Gradient Map and change this layer to Color at 50% Opacity. Last but not least go to the Color#3 layer, change your FG to a strong green (3bfc0e) and your BG to a brown (7c3e32), do one more Gradient Map and set this layer to Overlay at 20% Opacity.

 Step 8
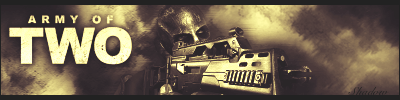
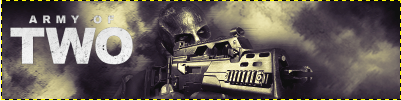
Go Edit>Copy Visible then Edit>Paste and move this layer to the top of the stack. If you sig is looking too dark go Color>Brightness-Contrast and change the brightness setting to 30 and the contrast setting to 10. Now to add the main text. I am using the logo for the game Army Of Two, which my render is from, you can either use a logo or some large, thick text. Paste in the logo or create your text on a new transparent layer at the top of the stack.
 Step 9
Make a new transparent layer underneath the text/logo layer, select the text/logo layer and go Select>Transparency>Alpha To Selection. Now go back to the empty layer, go Select>Grow by 1 pixel then change your FG color to black and go Edit>Fill with FG. Now to finish off go Filters>Blur>Gaussian Blur and change the settings to around 10.
 Step 10
Now do another Edit>Copy Visible and Edit>Paste onto a new transparent layer at the top of the stack. Now go Color>Desaturate and duplicate this layer 3 times. On the first duplicated layer, change your FG color to a strong red, I used ff1010 and your BG to a strong yellow, I used efe70d. Go Color>Map>Gradient Map. Set this layer to Overlay at 60% Opacity. Now go to the second duplicated layer, change your FG to a strong blue (0617ed) and leave your BG as a strong yellow. Do another Gradient Map and change this layer to Overlay at 60% Opacity. Last but not least go to the third duplicated layer, change your FG to a strong green (3bfc0e) and leave the BG as a yellow. Do one more Gradient Map and set this layer to Overlay at 20% Opacity.
 Step 11
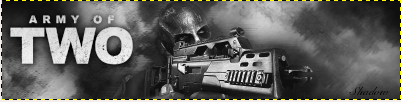
Now you can add a border if you want to. To finish off go Edit>Copy Visible then Edit>Paste and if your sig is too dark go Color>Brightness-Contrast and change the Brightness setting to 50 and the Contrast setting to 20.

I hope you have enjoy this tutorial, all feedback is welcome and I am looking forward to seeing some results